 |
azzdjw00000123
id071000700000
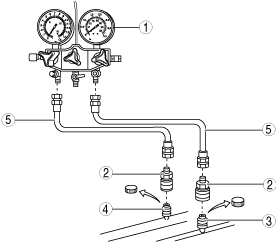
Connect Manifold Gauge
Connect manifold gauge to system piping
1.Close all the valves of the manifold gauge.
2.Connect a manifold gauge to the system piping.
azzdjw00000123
|
|
1
|
Manifold gauge
|
|
2
|
Quick coupler
|
|
3
|
High-pressure line charging valve
|
|
4
|
Low-pressure line charging valve
|
|
5
|
Charging hose
|
Connect manifold gauge to the vacuum pump/refrigerant tank
1.Connect a manifold gauge to the vacuum pump/refrigerant tank.
azzdjw00000124
|
|
1
|
Manifold gauge
|
|
2
|
Vacuum pumps hose
|
|
3
|
Vacuum pump
|
|
4
|
Charging hose
|
|
5
|
Valve
|
|
6
|
Refrigerant tank
|
|
7
|
Measuring instrument
|
Inspect Refrigerant Pressure
1.Prepare the vehicle as follows.
2.Wait for 8 min after the engine is started.
3.Record the pressure indicated on the manifold gauge and ambient temperature for 2 min.
4.Verify that the refrigerant pressure on the high pressure side and low pressure side is within the range of the shaded area shown in the figure.
High pressure side
azzezw00000368
|
|
1
|
Refrigerant pressure (MPa{kgf/cm2, psi})
|
|
2
|
Ambient temperature (°C{°F})
|
Low pressure side
azzezw00000369
|
|
1
|
Refrigerant pressure (MPa{kgf/cm2, psi})
|
|
2
|
Ambient temperature (°C{°F})
|