

QUICK RELEASE CONNECTOR (FUEL SYSTEM) REMOVAL/INSTALLATION [SKYACTIV-G]
Replacement Part
Retainer
Quantity: 1
Location of use: Quick Release Connector (Type B)
Oil and Chemical Type
Engine oil
Type: Recommended oil
Warning
- Highly pressurized fuel may spray out if the fuel line is cut. Due to the following dangers occurring with a fuel spray, always complete the “Fuel Line Safety Procedure” to prevent the fuel from spraying.
― Fuel may cause irritation if it comes in contact with skin and eyes.
― If fuel ignites and causes a fire, it may lead to serious injury or death, and damage to property and facilities. - A person charged with static electricity could cause a fire or explosion, resulting in death or serious injury. Before performing work on the fuel system, discharge static electricity by touching the vehicle body.
Caution - Disconnecting/connecting the quick release connector without cleaning it may cause damage to the fuel pipe and quick release connector. Always clean the quick release connector joint area before disconnecting/connecting using a cloth or soft brush, and make sure that it is free of foreign material.
Quick Release Connector Type
Caution
- Verify the type and location, and install/remove properly.
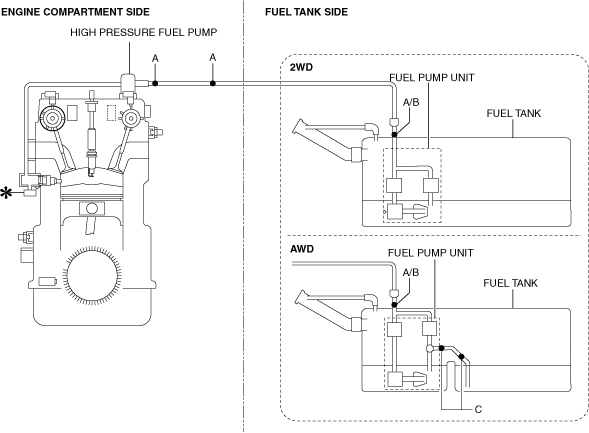

Type B Removal
Caution
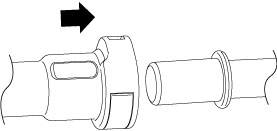
• Be careful not to damage the fuel pipe when unlocking the retainer.
Note
• If the quick release connector is removed, replace the retainer with a new one.


Type A Installation
Note
- If the quick release connector O-ring is damaged or has slipped, replace the fuel hose.
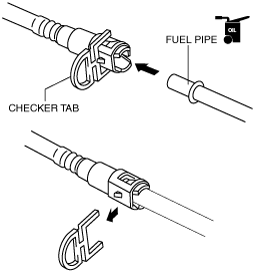
- A checker tab is integrated with the quick release connector for new fuel hoses. Remove the checker tab from the quick release connector after the connector is completely engaged with the fuel pipe.
- Inspect the fuel hose and fuel pipe sealing surface for damage and deformation.
- If there is any malfunction, replace it with a new one.
- Install the quick release connector.
When fuel hose is exchanged
- Insert the fuel pipe straight to the end of the quick release connector.
- Push down the retainer using a finger.
― If the retainer cannot be pushed down, push the fuel pipe further to the quick release connector. - Remove the checker tab.
― Do not use pliers.
When fuel hose is not exchanged - Insert the fuel pipe straight to the end of the quick release connector.
- Push down the retainer using a finger.
― If the retainer cannot be pushed down, push the fuel pipe further to the quick release connector. - Lightly pull and push the quick release connector a few times by hand, and then verify that it is connected securely.
- Complete the “AFTER SERVICE PRECAUTION”.
Type B Installation
Note
- If the quick release connector O-ring is damaged or has slipped, replace the piping component.
- A checker tab is integrated with the quick release connector for new fuel hoses and fuel hoses. Remove the checker tab from the quick release connector after the connector is completely engaged with the fuel pipe.
- Inspect the fuel hose and fuel pipe sealing surface for damage and deformation.
- If there is any malfunction, replace it with a new one.
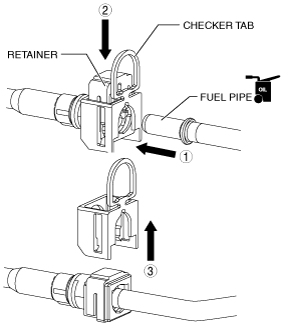
- Apply a small amount of clean engine oil to the sealing surface of the fuel pipe.
- Install a new retainer to the quick release connector.
- Reconnect the fuel hose straight to the fuel pipe until a click is heard.
- Lightly pull and push the quick release connector a few times by hand, and then verify that it is connected securely.
- Complete the “AFTER SERVICE PRECAUTION”.
Type C Installation
Note
• If the quick release connector O-ring is damaged or has slipped, replace the piping component.
1. Inspect the evaporative hose and evaporative pipe sealing surface for damage and deformation.
• If there is any malfunction, replace it with a new one.
 |
2. Apply a small amount of clean engine oil to the sealing surface of the evaporative pipe.
3. Reconnect the hose straight to the pipe until a click is heard.
4. Lightly pull and push the quick release connector a few times by hand, and then verify that it is connected securely.